November 2019

menutop.png


In This Newsletter


AVAproject Fusion: Real-Time Integration with ERP Systems

Control Material List Generation with Frame Construction Preferences

Adding Catalogs to the AVAware Library

AVAcad Tip: A Nodeworthy Lesson


Watch AVAproject Tip Video!


Catalog Updates


 U.S. Price Books:

  • Bobrick
  • Ceco
  • Curries
  • Detex
  • Dorma D.C.
  • Dorma E.D.
  • Dorma Glass
  • Dorma L.K.
  • dormakaba MECH LK
  • Falcon
  • FSB
  • Glynn-Johnson
  • Hager
  • Ives
  • Kwikset
  • LCN
  • Marks
  • McKinney
  • National Guard
  • Norton
  • Republic
  • Rutherford
  • Sargent
  • Schlage
  • Schlage E.S.
  • Select
  • Von Duprin
  • Yale
  • Zero


 Canadian Price Books:

  • Baron
  • Bobrick
  • Glynn-Johnson
  • McKinney
  • Rutherford
  • Sargent
  • Yale


AVAproject Fusion:
Real-Time Integration with ERP Systems


AVAproject Fusion with its API-enabled connector modules provides seamless integration with many ERP/Accounting platforms. Fusion "popups" in AVAproject offer real-time information on sales and purchase orders generated for any part of the project.


System developers have traditionally favored an "all-in-one" approach to combining front-end business systems with back-end ERP/accounting solutions. This of course comes with some very obvious limitations. Most notably, users of that front-end system are limited to a single accounting package that has been preselected for them by the developer.

AVAware has always taken the position that no single accounting package could possibly be ideal for every company. It's for that reason AVAproject Fusion was developed, to enable AVAproject users to integrate with the accounting system of their choice.

Proponents of the "all-in-one" approach in system design, have maintained that theirs was the only way to achieve true end-to-end process integration. AVAproject fusion has proven that this is simply not the case.

Through the use of custom designed "connector" modules, AVAproject Fusion is able to take advantage of integration APIs ("Application Programming Interface") offered by the various accounting system developers. These APIs allow the seamless exchange of information between AVAproject and the accounting/ERP package. AVAproject Fusion is able to harvest the relevant project data originating from AVAproject, and manage it through the product sourcing and staging processes. Purchase and sales orders, initiated by Fusion, are automatically created in the accounting package.


» Click here to read full article...


Control Material List Generation with Frame Construction Preferences


AVAproject users have come to depend on detailed component material lists automatically generated from AVAcad elevations. Frame construction preferences provide a variety of additional options to control the way in which frames are deconstructed - down to the last detail.


AVAcad is able to deconstruct frame elevations based on construction preferences set forth by the selected manufacturer. In addition to pricing, AVAware product catalogs contain parameters that govern exactly how the frame is to be assembled. This include joint and welding options, field splices and choices such as when to use filler pieces as opposed to mullion cut-outs.

For example, the sidelite frame depicted below contains a partial mullion that can be constructed by using either a black jamb with a filler strip as shown in 'Material List A' or mullion with a cut-out as shown in 'Material List B'.


» Click here to read full article...


Adding Catalogs to the AVAware Library


Despite the ever-growing collection of catalogs offered in the AVAware library, AVAproject users and manufacturers alike are always interested in adding even more. AVAware offers several different ways in which additional product catalogs can be made available.


AVAware offers a massive library of architectural products catalogs designed to enhance the AVAproject detailing and estimating system by providing a wealth of essential product and pricing information. Many of these catalogs provide additional information beyond even the printed price books on which they're based, including technical details and catalog cuts.

The AVAware library offers an extensive range of popular manufacturer brands ranging from hollow metal and wood doors and frames, to hardware products in both divisions eight and ten. Despite the size of this ever-growing library, invariably users encounter manufacturers that are not represented. Typically these are regional or niche brands that appeal to a smaller number of users, and as such have not been incorporated into the collection.

For these users, there are essentially three options offered to allow them to see these products available to them as electronic catalogs.


» Click here to read full article...


AVAcad Tip: A Nodeworthy Lesson

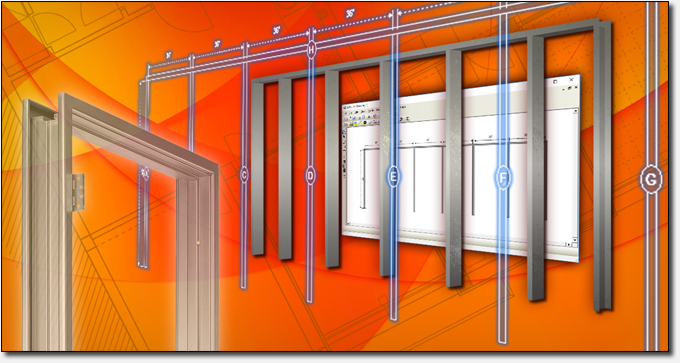
AVAcad is central component of the AVAproject detailing and estimating system. AVAcad is a powerful and convenient drawing tool that enables users with little or no CAD experience to create complex architectural opening elevations with ease.

AVAcad is equipped with a variety of features designed to make the task of creating elevations as simple and efficient as possible.

Below are a set of "pro tips" that can be used to make the process even easier.


Tip 1: Nodes


The AVAcad 'stick' tool is used to create frame sections within opening elevations. When sticks are drawn, the end points are identified with 'nodes' that show up in blue, to indicate points at which sticks are connected or can be connected to. When drawing a new stick component there's no need to be concerned with how the connective joints are formed - AVAcad takes care of that automatically. All one needs to do is begin drawing on a highlighted node, and the correct joint is automatically created.

There's also no need for exact precision when drawing components. As long as the end node is highlighted, the new component will be correctly snapped into alignment with the existing elevation.


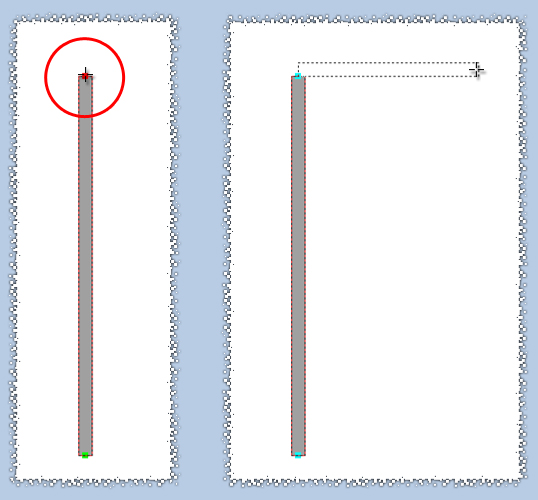
They also highlight in green when the cursor is aligned with them, either horizontally or vertically. This is particularly useful when wanting to draw a section that aligns perfectly with existing components in an elevation. As a stick is being drawn, adjacent nodes light up in green to indicate when the cursor is aligned with them. Releasing the drawing tool at this moment will result in a component this is perfectly aligned to the highlighted node.


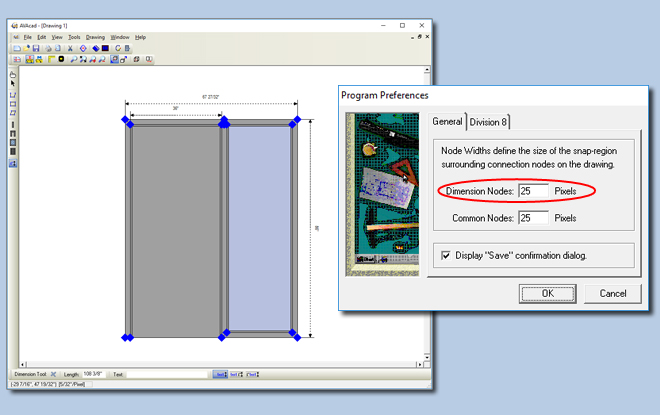
The nodes can be increased in size to make the endpoint even easier to join or align to. The size of the nodes can be adjusted through the 'AVAcad Preferences' dialog. This is particularly useful for novice users or simply to accelerate the drawing process.


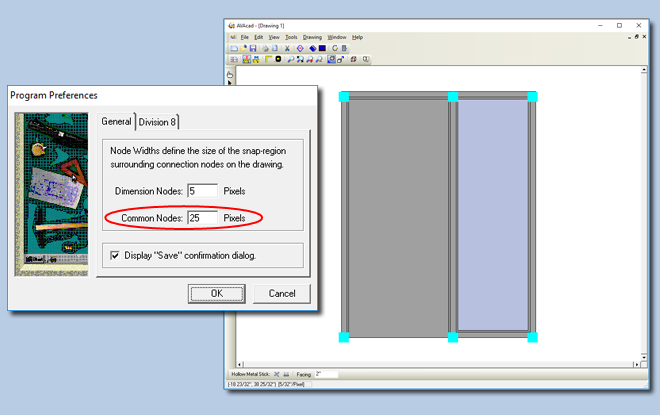
The size of 'dimension nodes' can also be adjusted, making the process of adding dimensions to elevations even faster. Once again, this setting is found in the 'AVAcad Preferences' dialog and allows users to increase the size of nodes used to place dimension lines.


Tip 2: Joints


When elevations are created in AVAcad, a number of important details are automatically taken care of by the software; most notably, the manner in which individual frame sections are joined together. Each time two pieces of frame material join together or intersect; there are multiple ways in which the resulting joint can be formed. AVAcad automatically selects the appropriate one based on standard industry practices and manufacturing preferences set forth by individual manufacturers.

For example: corners joints are typically mitered, while center joints and intersections require either the vertical or horizontal section to be cut and notched to fit with the other.

The 'Node Edit' tool allows users to override the choice made by AVAcad in respect of what type of joint is used. Clicking on any node will cause the current joint to be highlighted and the list of all possible alternatives is offered.

In the case of this corner joint, the user has a choice of a miter or of notching with the vertical or horizontal section.


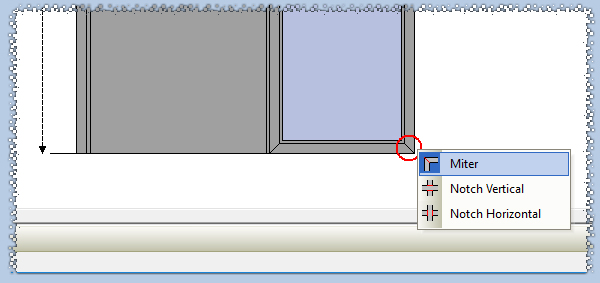
At center joints, the only choices offered would be to notch one component or another.


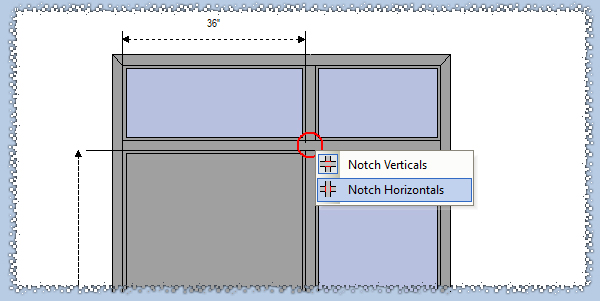
When an alternate joint type is selected, AVAcad automatically reconfigures the drawing using the one selected. This choice will also be reflected on the material generated from the elevation.


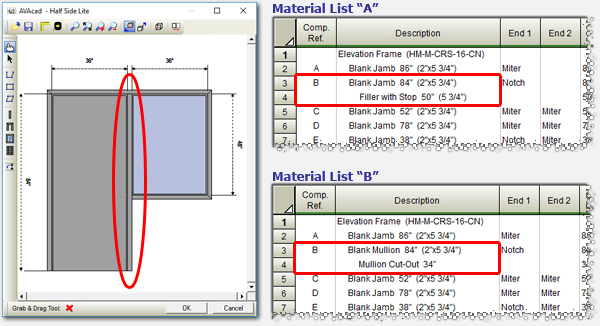
Tip 3: Resizing the Elevation


The final step in creating any elevation is correctly sizing the various components. It's far easier and more efficient to complete an elevation and size it afterwards than to attempt to draw each individual component to its required size at the same time.

Once the dimensions are in place, it's a simple matter to move frame components as required. The "Grab and Drag" tool allows users grab onto any individual piece and drag it into position. AVAcad recognizes the connections between adjacent components and adjusts those as is necessary; all the while, updating the various dimensions. Even doors and glass lites that have been placed into the frame are automatically resized as the frame sections are moved.


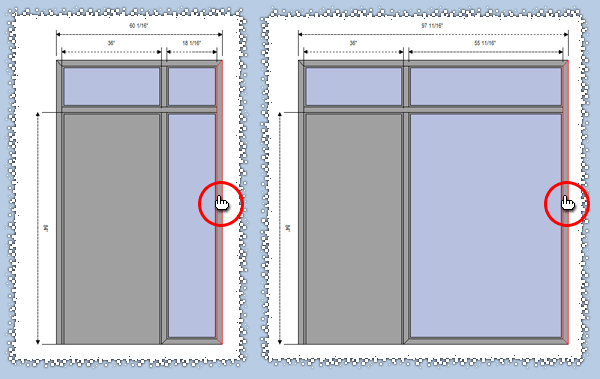
The quickest way to accurately resize the frame components is to do so using the dimensions themselves. After clicking on a given dimension, the actual length can be modified at the bottom of the elevation. AVAcad will automatically resize the frame to correspond with the new dimensional value.


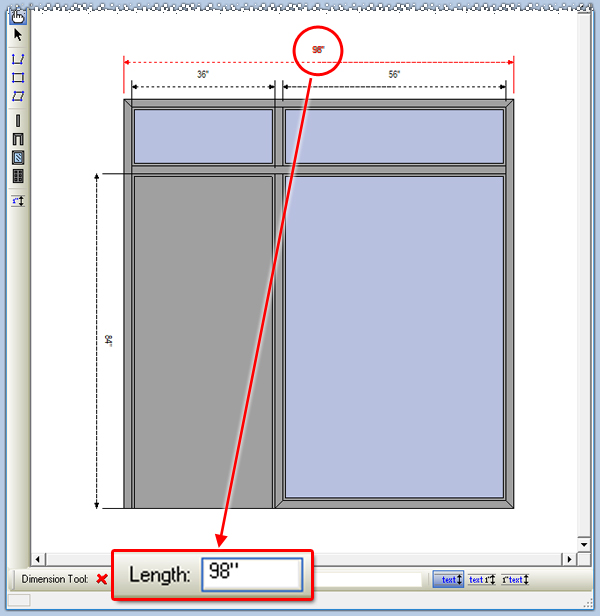
Since AVAcad resizes the frame by moving the nodes to right and downwards, the most effective means in which to resize the entire frame is to move from left to right and from the top to bottom until all the dimensions are sized correctly.


AVAproject Tips now feature accompanying overview and demonstration videos courtesy of the AVAware production team.

Click below to view the video for this month's Tip!


Visit The AVAware YouTube Channel and Connect on Social Media


In addition to the embedded links found on the AVAware website and with our newsletters, all our videos can be directly accessed through our YouTube channel. Our subscribers will have the opportunity to preview videos prior to their official release. Please don't forget to subscribe in order to be automatically notified as new content becomes available.

While you're at it, don't forget to connect, follow & like AVAware on all your favorite social media platforms to receive immediate notifications of newly published content and releases.

"Connect" with us
 linkedin.com/company/AVAware

"Follow" us
 @AVAware

"Like" us
 facebook.com/AVAwareTech

"Subscribe"
 YouTube Channel


We welcome any questions, comments or suggestions about any topic mentioned in this edition of AVAwire. Please visit our website for more information, or contact us directly at (416) 239-9099.